Run a shop · Organize a collection · Prove every watch's story — in plain English
Everything the app does — running a repair shop, organizing a collection, and proving a watch’s history — explained in plain English, one short chapter at a time. Read it cover to cover or jump to the part that’s yours.
Free Edition
ticktocktracker.app
Get the free guide
The PDF in your inbox, plus the occasional product update. No spam — unsubscribe anytime.
Contents
Introduction
Part 1: Getting to Know Tick Tock Tracker
Chapter 1: What Is Tick Tock Tracker, and Why Should You Care?
Chapter 2: Installing the App and Finding Your Way Around
Chapter 3: The Two Sides of the App, in One Glance
Part 2: For Watchmakers — Running Your Shop
Chapter 4: Taking In Your First Watch
Chapter 5: Working the Job
Chapter 6: Getting Paid
Chapter 7: Letting the App Do the Talking
Part 3: For Collectors — Your Collection, Organized
Chapter 8: Building Your Collection
Chapter 9: What's It Worth?
Chapter 10: The Marketplace and Friends
Part 4: The Watch Passport — The Big Idea
Chapter 11: Provenance You Can Prove
Chapter 12: Verifying a Watch (the "CARFAX for Watches")
Part 5: The Part of Tens
Chapter 13: Ten Things the App Does So You Don't Have To
Chapter 14: Ten Ways to Get the Most Out of Tick Tock Tracker
Chapter 15: A Quick Word on Price
Introduction
About This Book
Tick Tock Tracker does two big things. It runs a watchmaker's repair business, and it organizes a watch collector's collection — and it quietly stitches the two together so a watch's history follows it forever.
That sounds like a lot. It isn't, once you see it. This book walks you through it the way a friend would: one small piece at a time, in order, with no assumptions that you already know how any of it works.
You don't have to read it cover to cover. Each chapter stands on its own. If you're a watchmaker, Parts 1, 2, and 4 are your bread and butter. If you're a collector, read Parts 1, 3, and 4. If you're both — plenty of people are — read the whole thing.
Remember
Remember: The whole point of this app is to do the boring, easy-to-forget work for you — texting customers, chasing parts, proving a watch's history. If something feels like it's making more work, you're probably doing it the hard way. Ask, and there's almost always a one-tap version.
Foolish Assumptions
In writing this, we assume:
You own a smartphone and can install an app from a website. That's the highest bar in this book.
You are not technical, and you don't want to be. You want to fix watches, or enjoy your collection, not learn software.
You've been running things on paper tickets, texts, sticky notes, or a spreadsheet (watchmakers), or in your head and a shoebox of receipts (collectors). You're tired of it.
If that's you, you're in the right place.
Icons Used in This Book
Throughout the book, little icons flag things worth slowing down for:
💡 Tip — a shortcut or a smarter way to do something.
⚠️ Warning — a place people trip. Read these; they save headaches.
📌 Remember — the one thing from a section to keep in your head.
🔧 Technical Stuff — what's happening under the hood. Totally skippable. Read it only if you're curious (or you're the kind of person who reads manuals for fun).
Where to Go from Here
Installed the app already? Jump to Part 2 (watchmakers) or Part 3 (collectors). Haven't installed it? Chapter 2 takes ninety seconds. Want the big idea that makes this app different from everything else? Skip straight to Part 4, the Watch Passport — that's the magic trick.
Part 1
Getting to Know Tick Tock Tracker
Chapter 1
What Is Tick Tock Tracker, and Why Should You Care?
Tick Tock Tracker is one app that does two jobs:
It runs a watchmaker's repair shop — taking in watches, tracking repairs, billing, and keeping customers in the loop.
It organizes a collector's collection — what you own, what it's worth, its history, and a trusted place to trade.
The clever part is that those two worlds live in the same app. So when a watchmaker finishes servicing a watch, the record of that work can land directly on the collector's watch — and travel with it forever. No other app connects the repair bench and the collector's shelf like that.
Why a watchmaker should care: Right now you're probably tracking jobs on paper, texting customers one at a time, and hoping you remember to tell someone their watch is ready. You lose tickets. You forget to follow up. You have no clean way to prove what you did. Tick Tock Tracker becomes the front desk you never had time to hire.
Why a collector should care: You've got watches and no single trustworthy place that records what they are, what they're worth, what's been done to them, and where they came from. When you sell, you can't prove any of it. Tick Tock Tracker is a digital home for your collection — and the proof that makes each watch worth more.
Technical Stuff
Technical Stuff: The app is a "Progressive Web App" (PWA). In English: it lives at a website (ticktocktracker.app), but you can add it to your phone's home screen so it looks and feels exactly like a normal app — no App Store, no download, instant updates. It's backed by a secure cloud so your data syncs across all your devices automatically.
Chapter 2
Installing the App and Finding Your Way Around
Installing it (about 90 seconds)
Open your phone's web browser and go to ticktocktracker.app.
Tap the Share button (the square with the arrow pointing up).
Tap Add to Home Screen.
That's it — a Tick Tock Tracker icon is now on your home screen, just like any other app.
Tip
Tip: Do this on your phone and your computer. The app works on both, and everything you do on one shows up on the other within seconds.
Making an account
Open the app and sign up with your email or your phone number. We send you a code — 8 digits by email, 6 by text — and you type it on the keypad. You can paste it or let your phone autofill it; tap the row of dots to bring up your keyboard if you'd rather do that.
There's no separate "log in." Signing up is signing in: put in the same email you used before and you land straight back in your own account, with everything where you left it. You cannot accidentally create a second one.
Remember
Remember: If the code doesn't arrive, check your junk folder — some mail providers file it there. And note the email code is 8 digits, not 6; nothing happens until all eight are in.
The first time you log in, the app walks you through a short setup wizard (more on that in the watchmaker and collector chapters). You can't really do this part wrong — it won't let you skip the steps that matter.
Warning
Warning: Set a PIN lock in Settings if your phone holds customer info or your collection's value. It's one tap and it keeps prying eyes out if someone picks up your phone.
The two sides
The app has two modes you turn on or off in Settings:
Repair Shop Mode — "Jobs, clients & invoices." This is the watchmaker side.
Collector Mode — "Collection, AI & marketplace." This is the collector side.
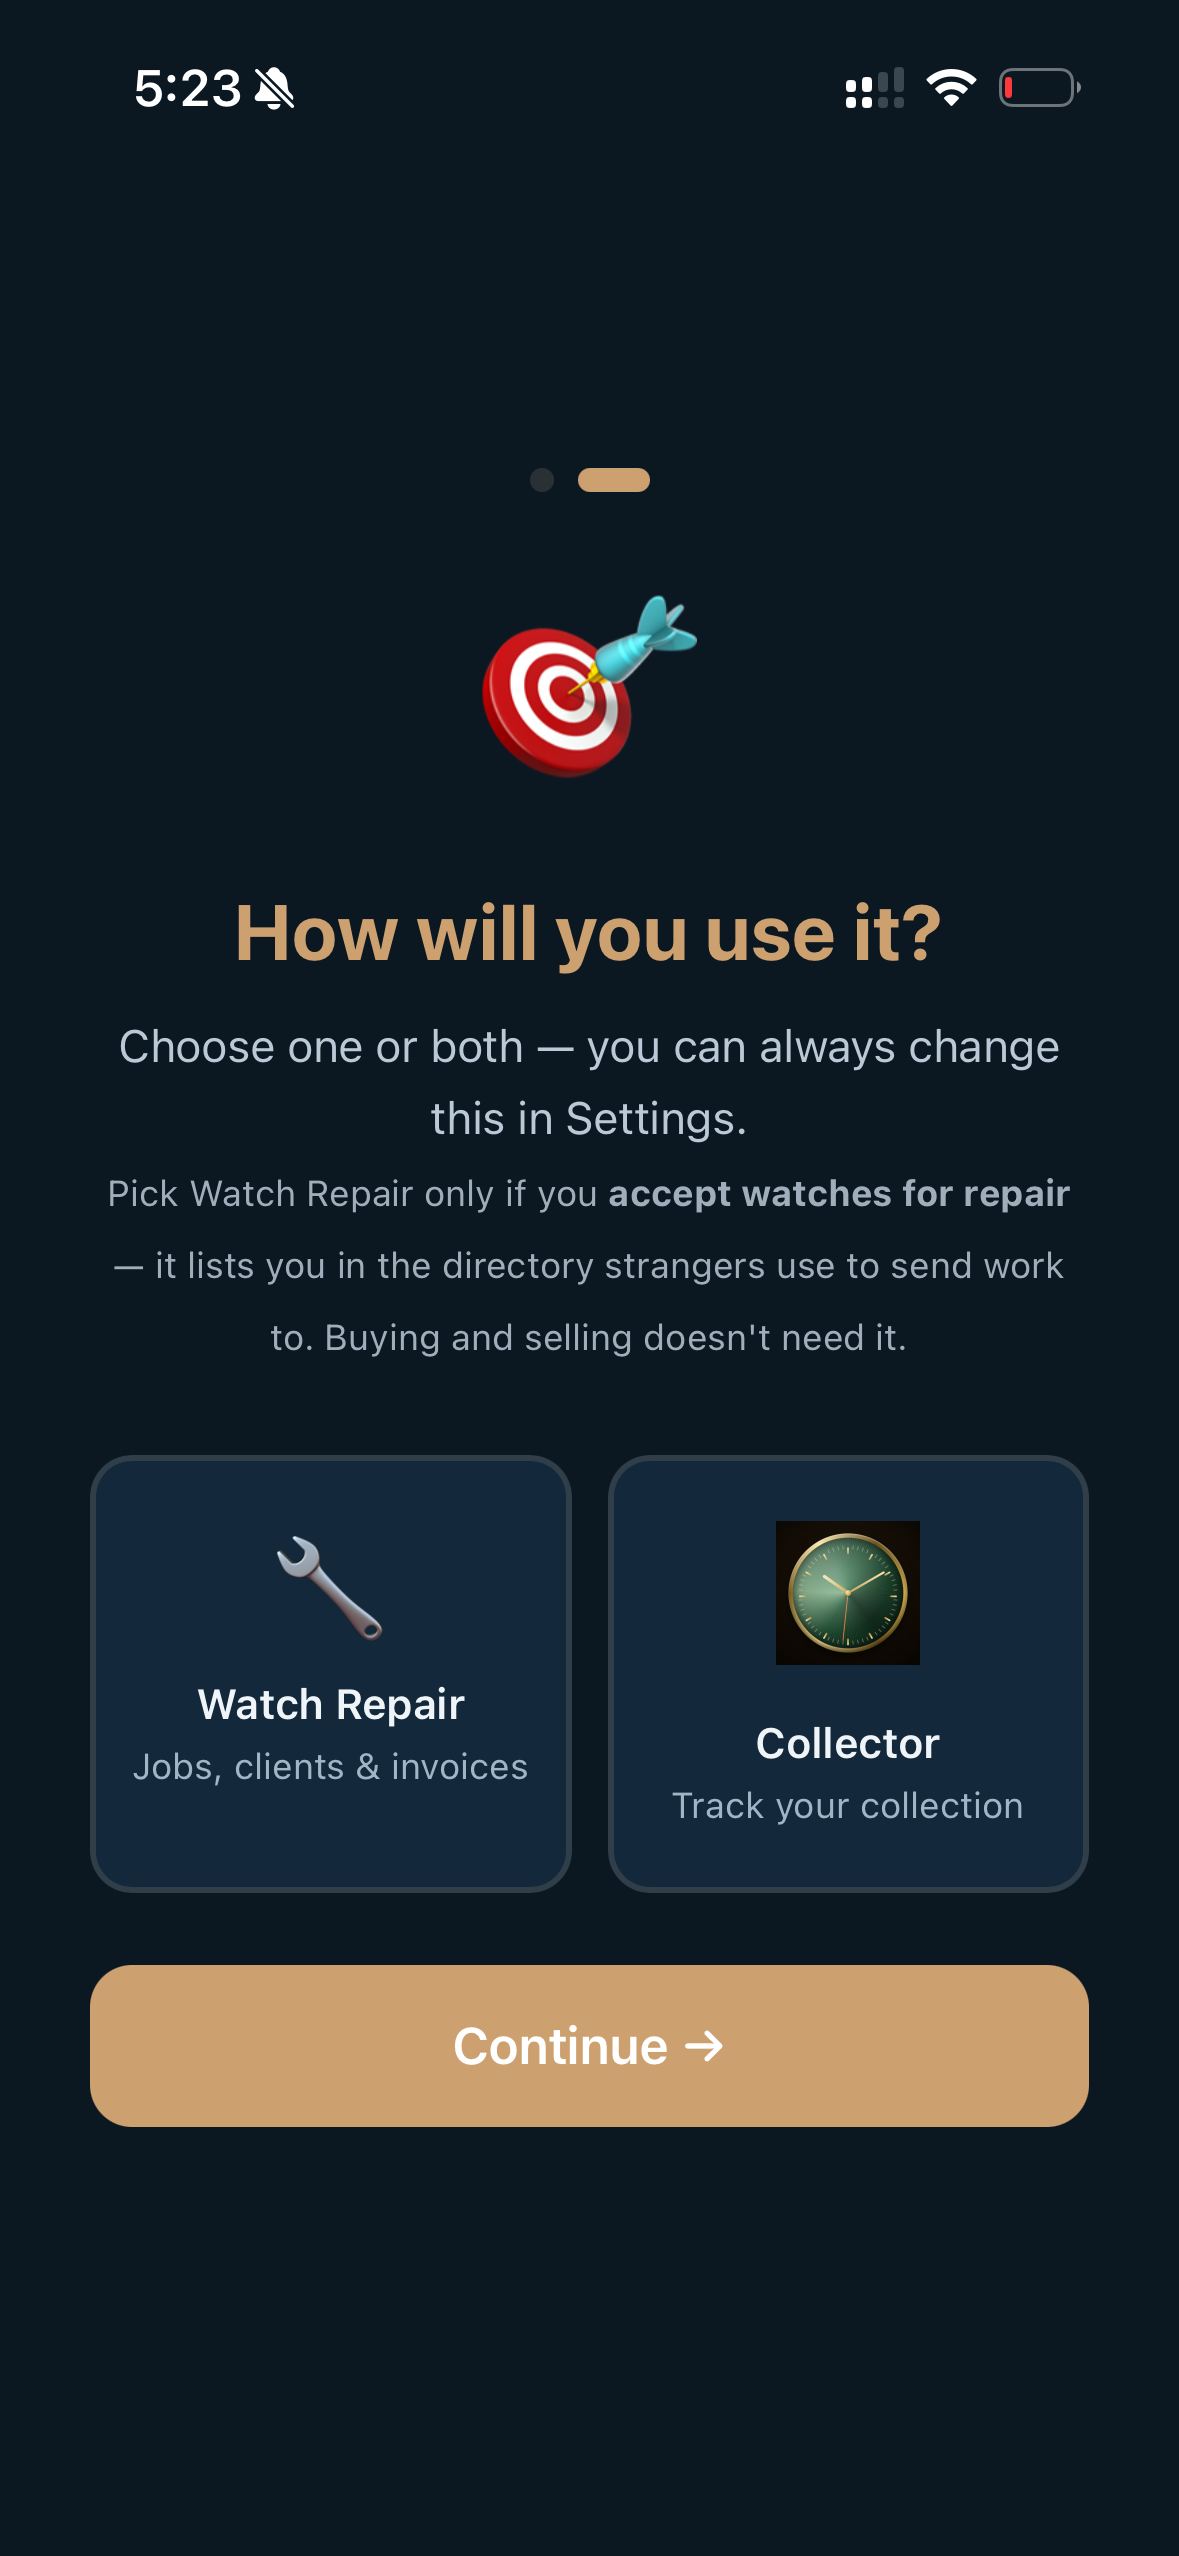
You choose during sign-up, and nothing is picked for you — the app won't move on until you say which you are. You can run one, the other, or both. Most watchmakers run both. Most collectors run just the collector side. Running both at once is a Pro feature (more on pricing in Chapter 15).
Warning
Warning:Repair Shop Mode is a public commitment, not just a set of features. Turning it on lists you in the directory collectors search when they need work done — which means strangers can post you their watches. If you buy and sell but don't take in repairs, you don't want it.
Remember
Remember: You're never locked in. Flip a mode on to peek at it, flip it back off. Your data is always safe — and if you end up listed and would rather not be, there's a List me in the directory switch in Settings → Edit Directory Listing. Turn it off and collectors stop seeing you, while your jobs, clients and watches stay exactly as they are.
Tip
Tip: If you signed up early on, the app may ask you once: "Do you accept watches for repair?" That's not a sales question. Our old sign-up screen ticked "Watch Repair" for people rather than asking, so some accounts ended up listed as shops by accident. Answer yes and nothing changes. Answer no and you come out of the repair directory — your watches, jobs and account are untouched. You'll only ever be asked once.
Chapter 3
The Two Sides of the App, in One Glance
Here's the cheat sheet. Don't memorize it — just know it exists so you know what's possible.
The Watchmaker side gives you:
A Jobs board — every watch in for repair, with a clear status from intake to delivered.
Intake forms — a web link customers use to check in their watch (no app needed on their end).
A client book — every customer, their history, their watches, with no accidental duplicates.
Billing — parts, labor, tax, discounts → a clean branded PDF invoice.
Parts tracking — order it, receive it, install it, and the customer gets told automatically.
Automatic customer updates — you change a status, the app texts and emails the customer. You never write the message.
Buy & send shipping labels — a prepaid label so a customer can mail a watch in, or a return label to ship one back — without leaving the app, with the postage added to their bill.
Get paid in the app — by card, straight to your bank.
The Collector side gives you:
A visual collection — every watch with its details and photos.
Collection Value — a "net-worth" dashboard for your watches.
An AI Advisor — point your camera at a watch for an instant ID and value estimate.
The Watch Passport — a permanent, provable history for each watch.
A Marketplace — buy, sell, and trade, including a private circle of trusted friends.
Find a watchmaker — and follow your repair right inside the app.
The next two parts take these one at a time. Pick your side.
Part 2
For Watchmakers — Running Your Shop
Chapter 4
Taking In Your First Watch
The goal of this chapter: get a real watch into the app in about five minutes, and never write an "I got your watch" text by hand again.
Setting up your shop (the one-time wizard)
First you're asked how you'll use the app. Nothing is chosen for you — you have to say.
Pick Watch Repair only if you take in other people's watches. The screen tells you what it means: it lists you in the directory strangers use to send work to.
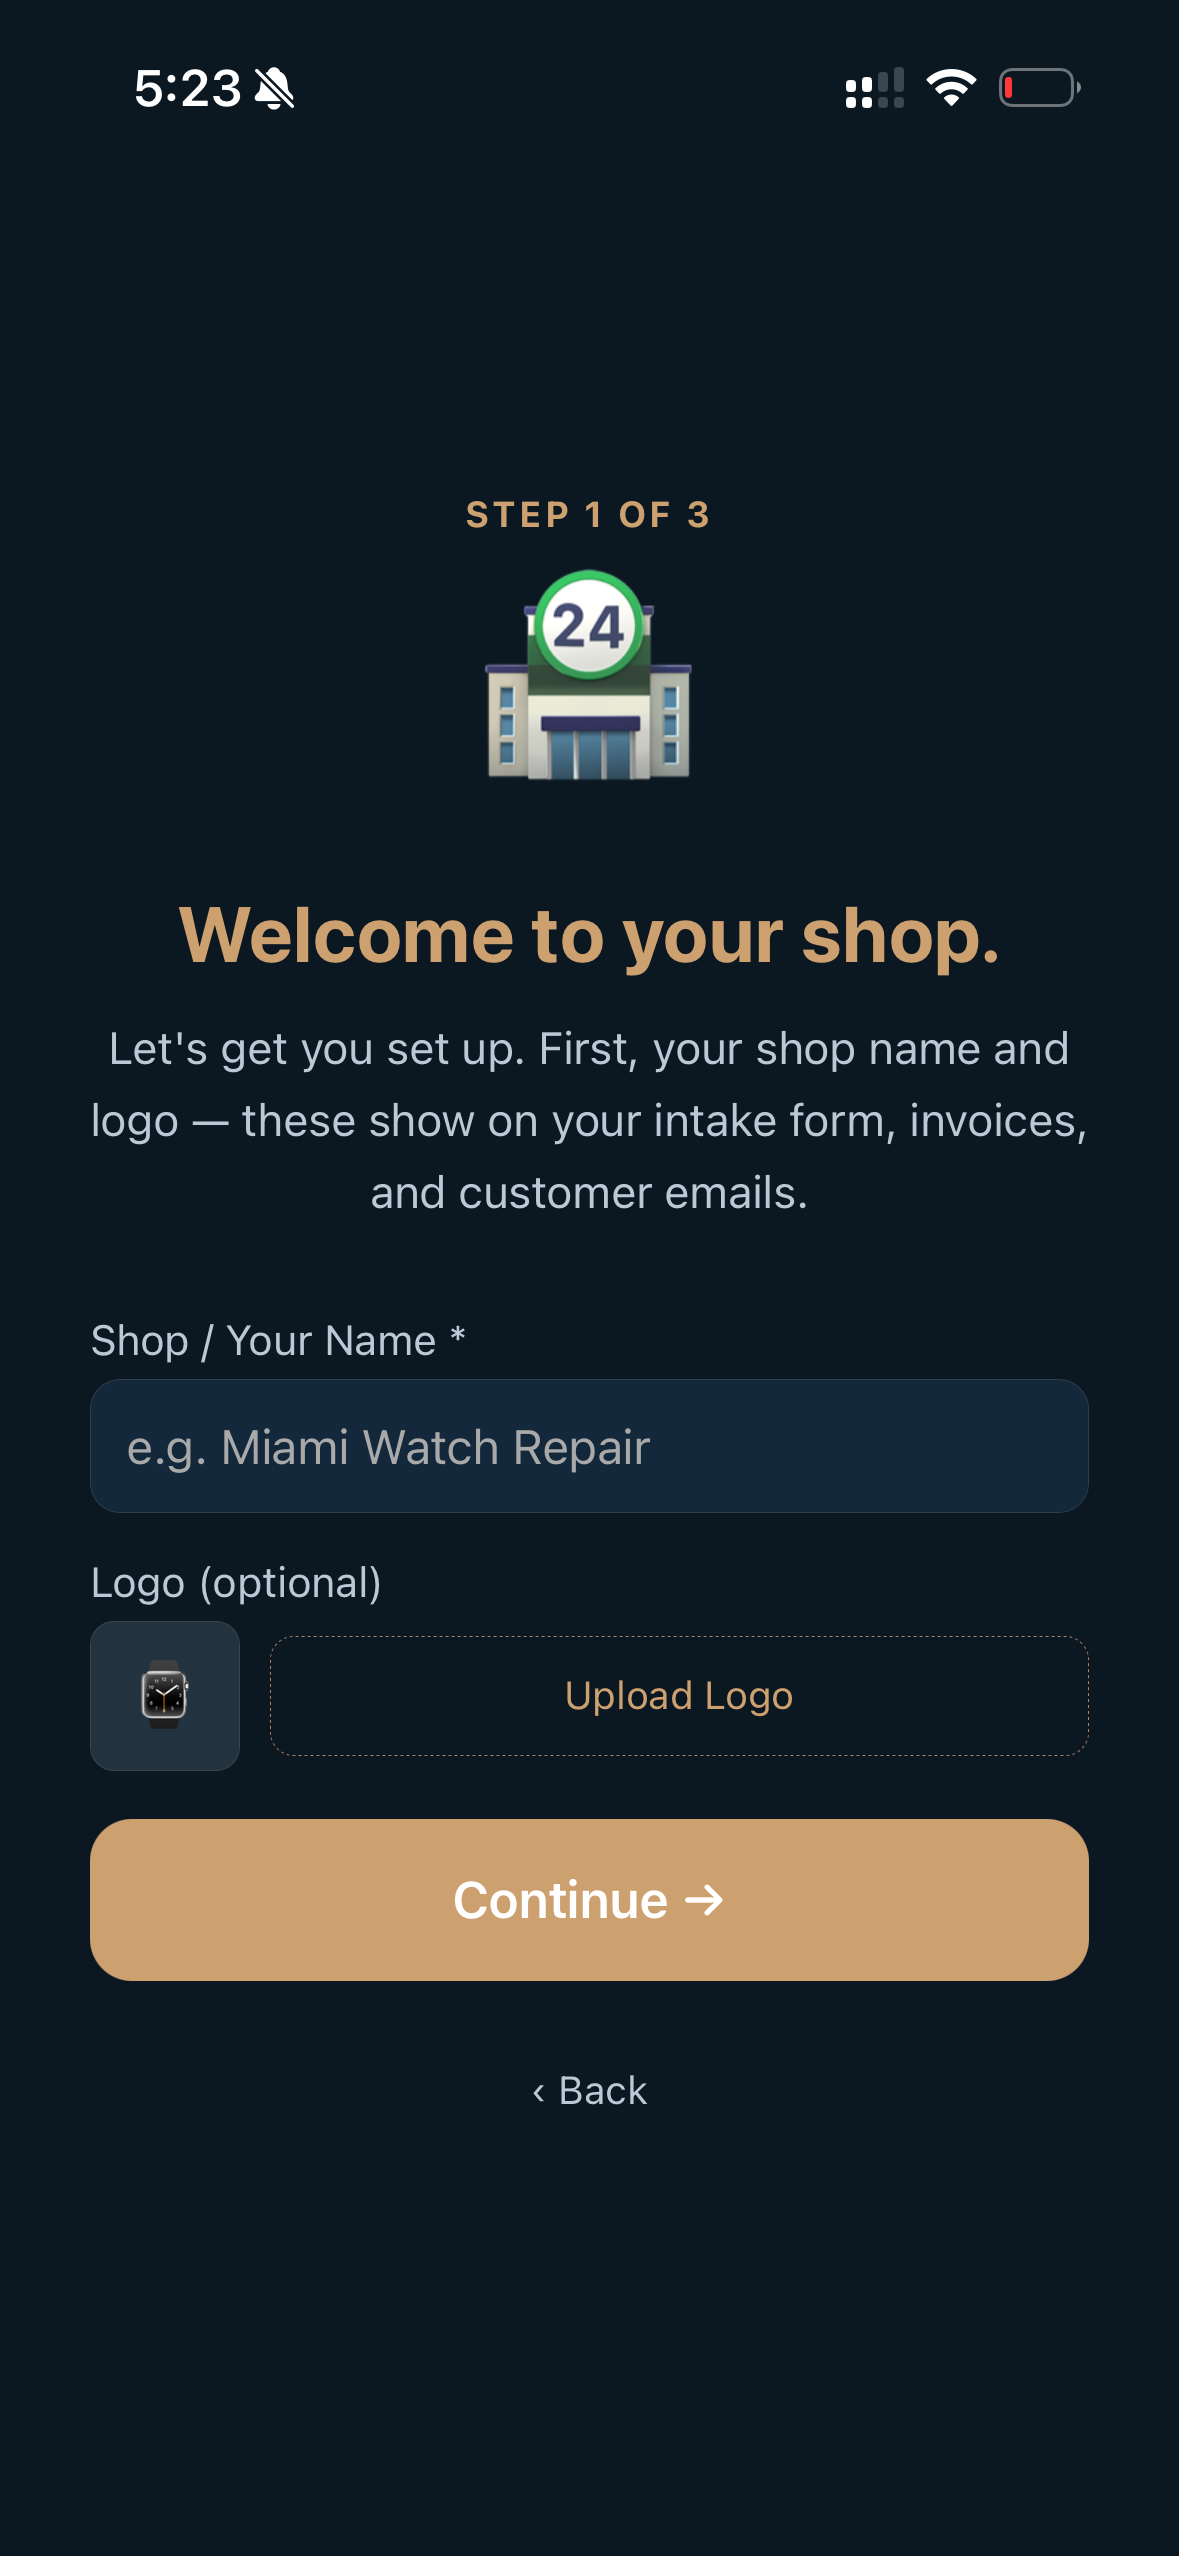
Then a full-screen setup wizard runs that you can't skip (on purpose — it makes sure the important stuff gets done). Four steps, about two minutes:
Shop name + logo — these show on your intake form, your invoices, and every email your customers get.
Step 1. Your shop name is what customers see everywhere. The logo is optional and you can add it later.
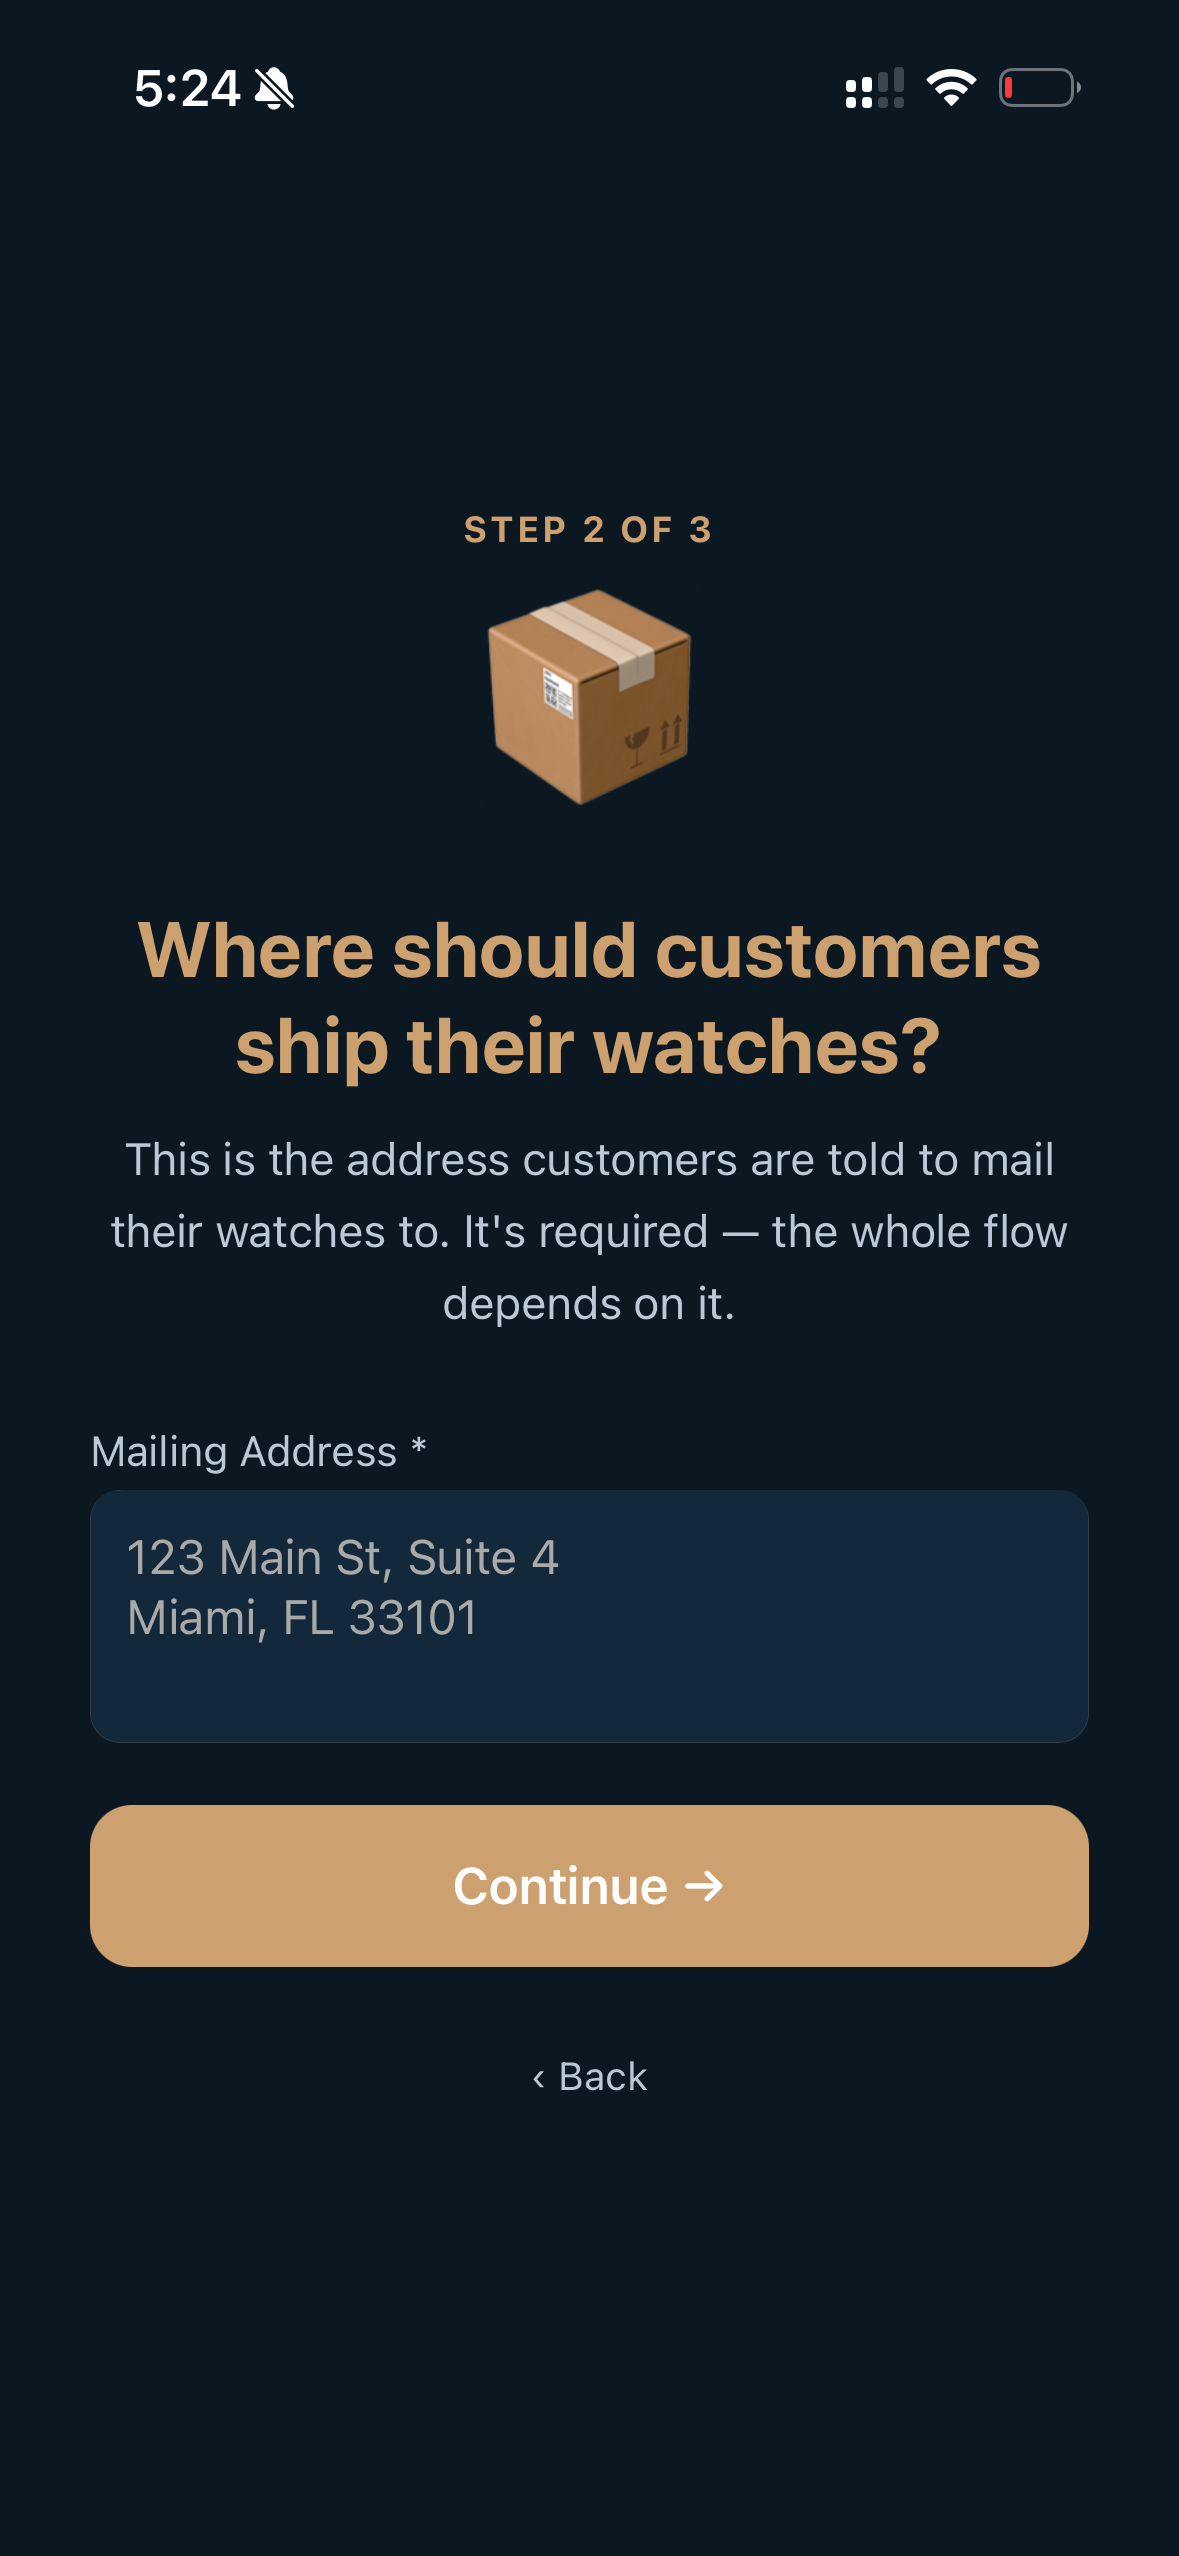
Mailing address — required. This is the address customers are told to ship watches to. Get it right; the whole flow depends on it.
Step 2. Required, because every "send me your watch" message the app writes will quote this address.
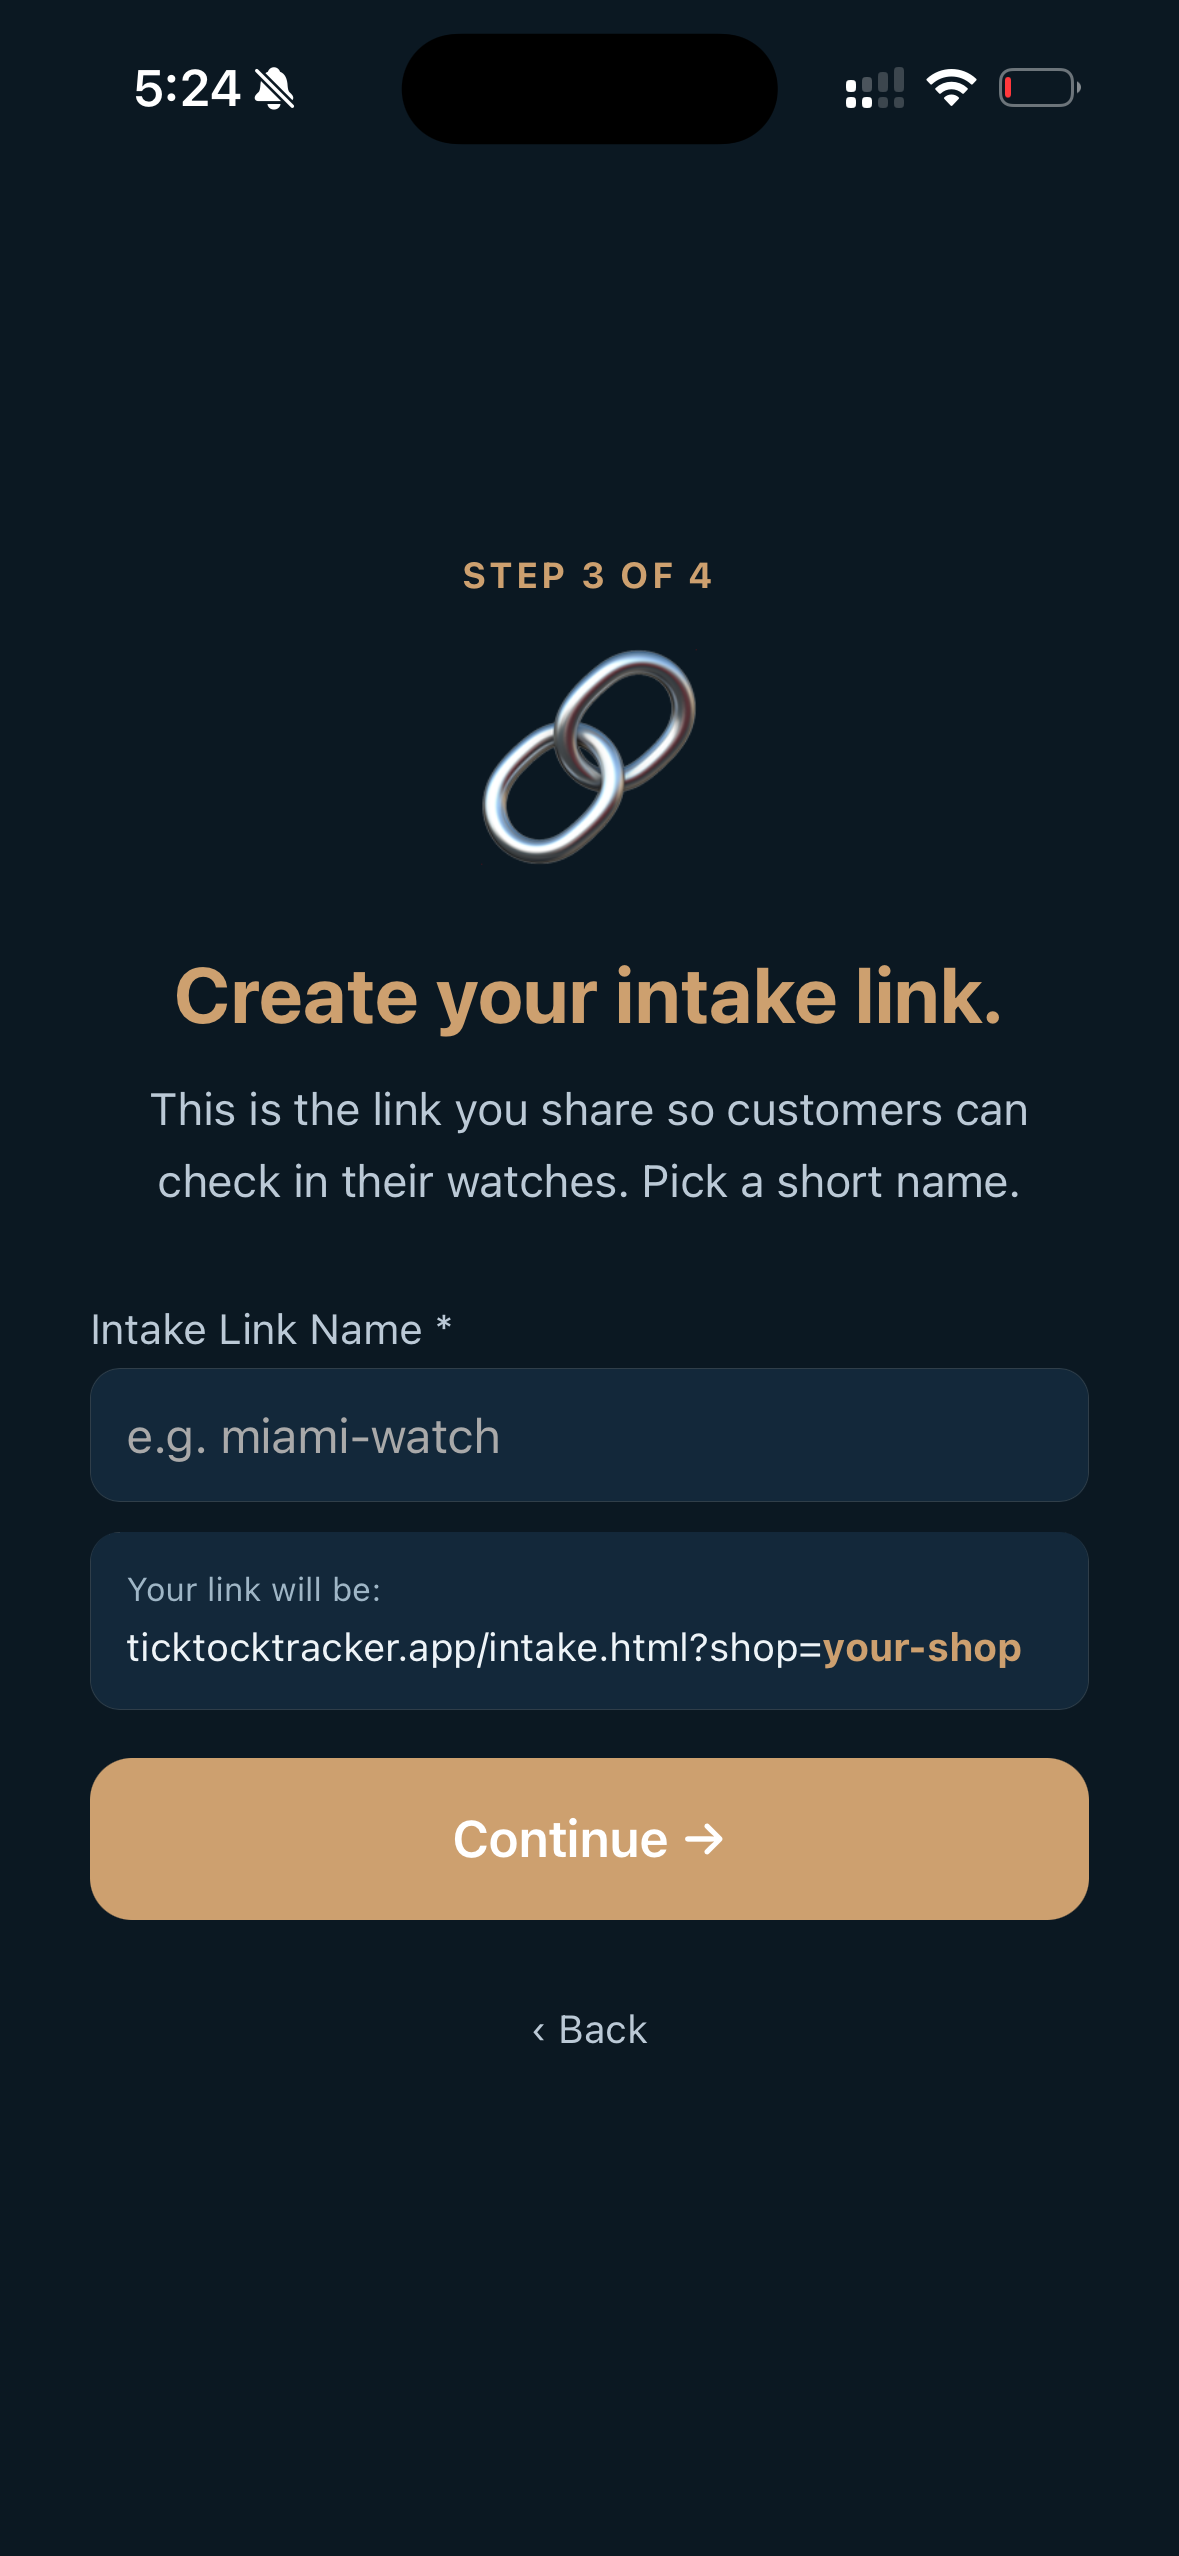
Your intake-link handle — a short custom web link you hand out to customers, with a live preview as you type. This is the link that does the work: someone taps it, fills in a quick form, and a job lands in your app.
Step 3. Pick something short and memorable — this is the link you'll put on a card, a receipt, or your shop window.
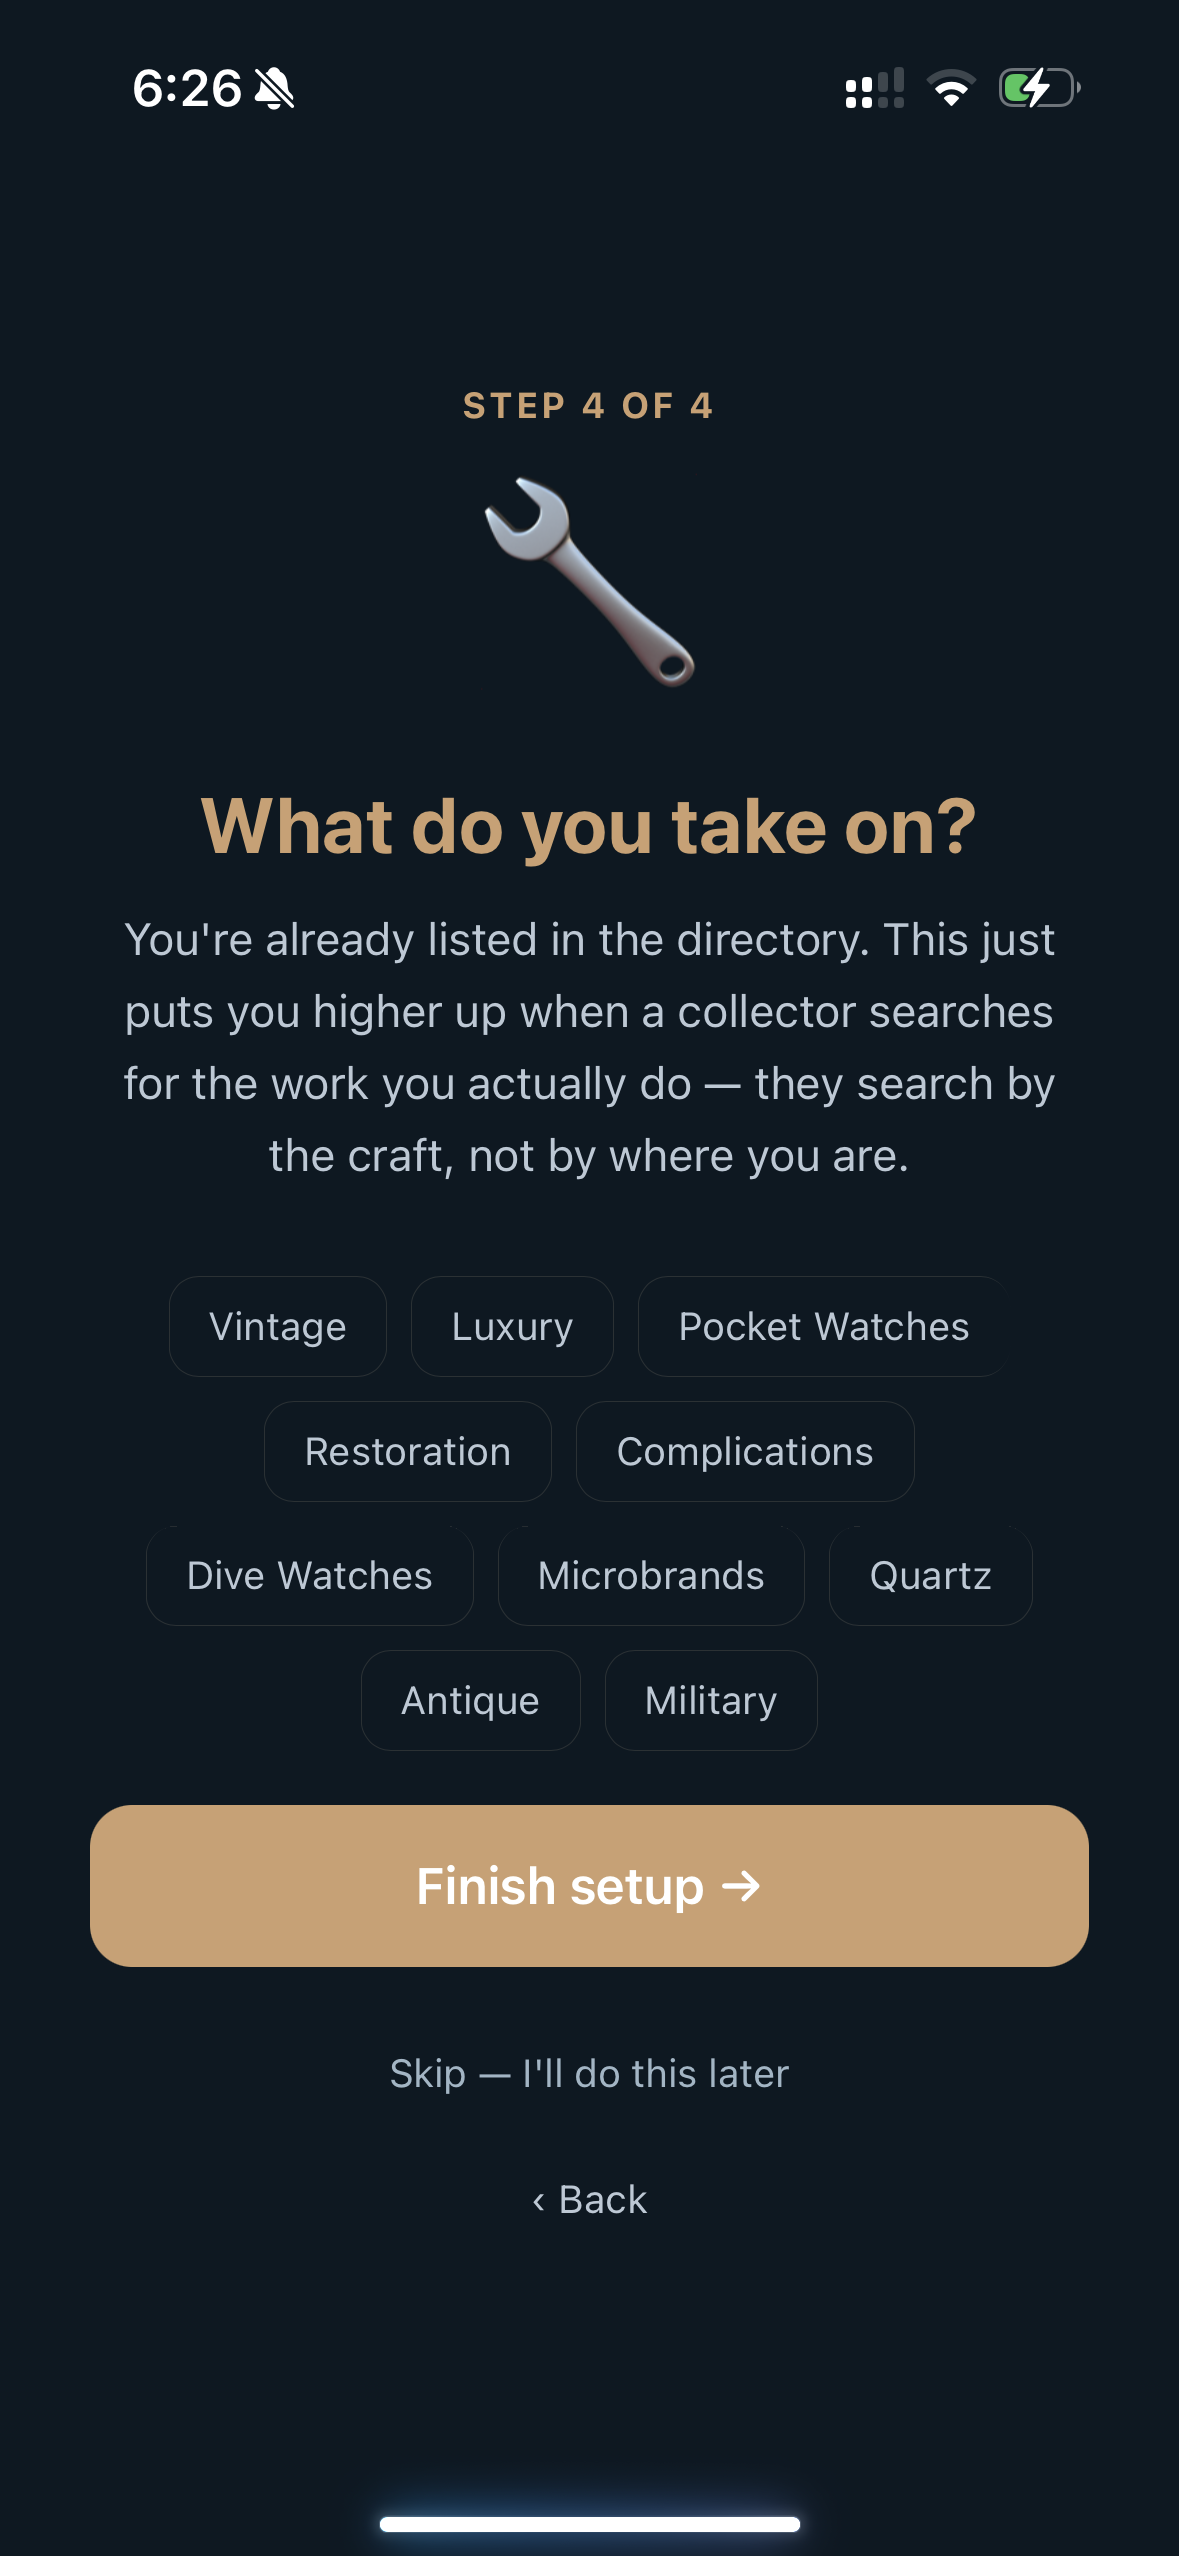
What you take on — tick the work you actually do: vintage, luxury, pocket watches, restoration, complications, quartz, and so on. There's a "Skip — I'll do this later" link, and you can, but it's the step that decides whether anyone finds you. Collectors search the directory by the work. A listing that doesn't say what you take on slides past every search that would have turned it up.
Step 4. Tick everything you genuinely take on — and nothing you don't. You can change these any time from Settings → Edit Directory Listing.
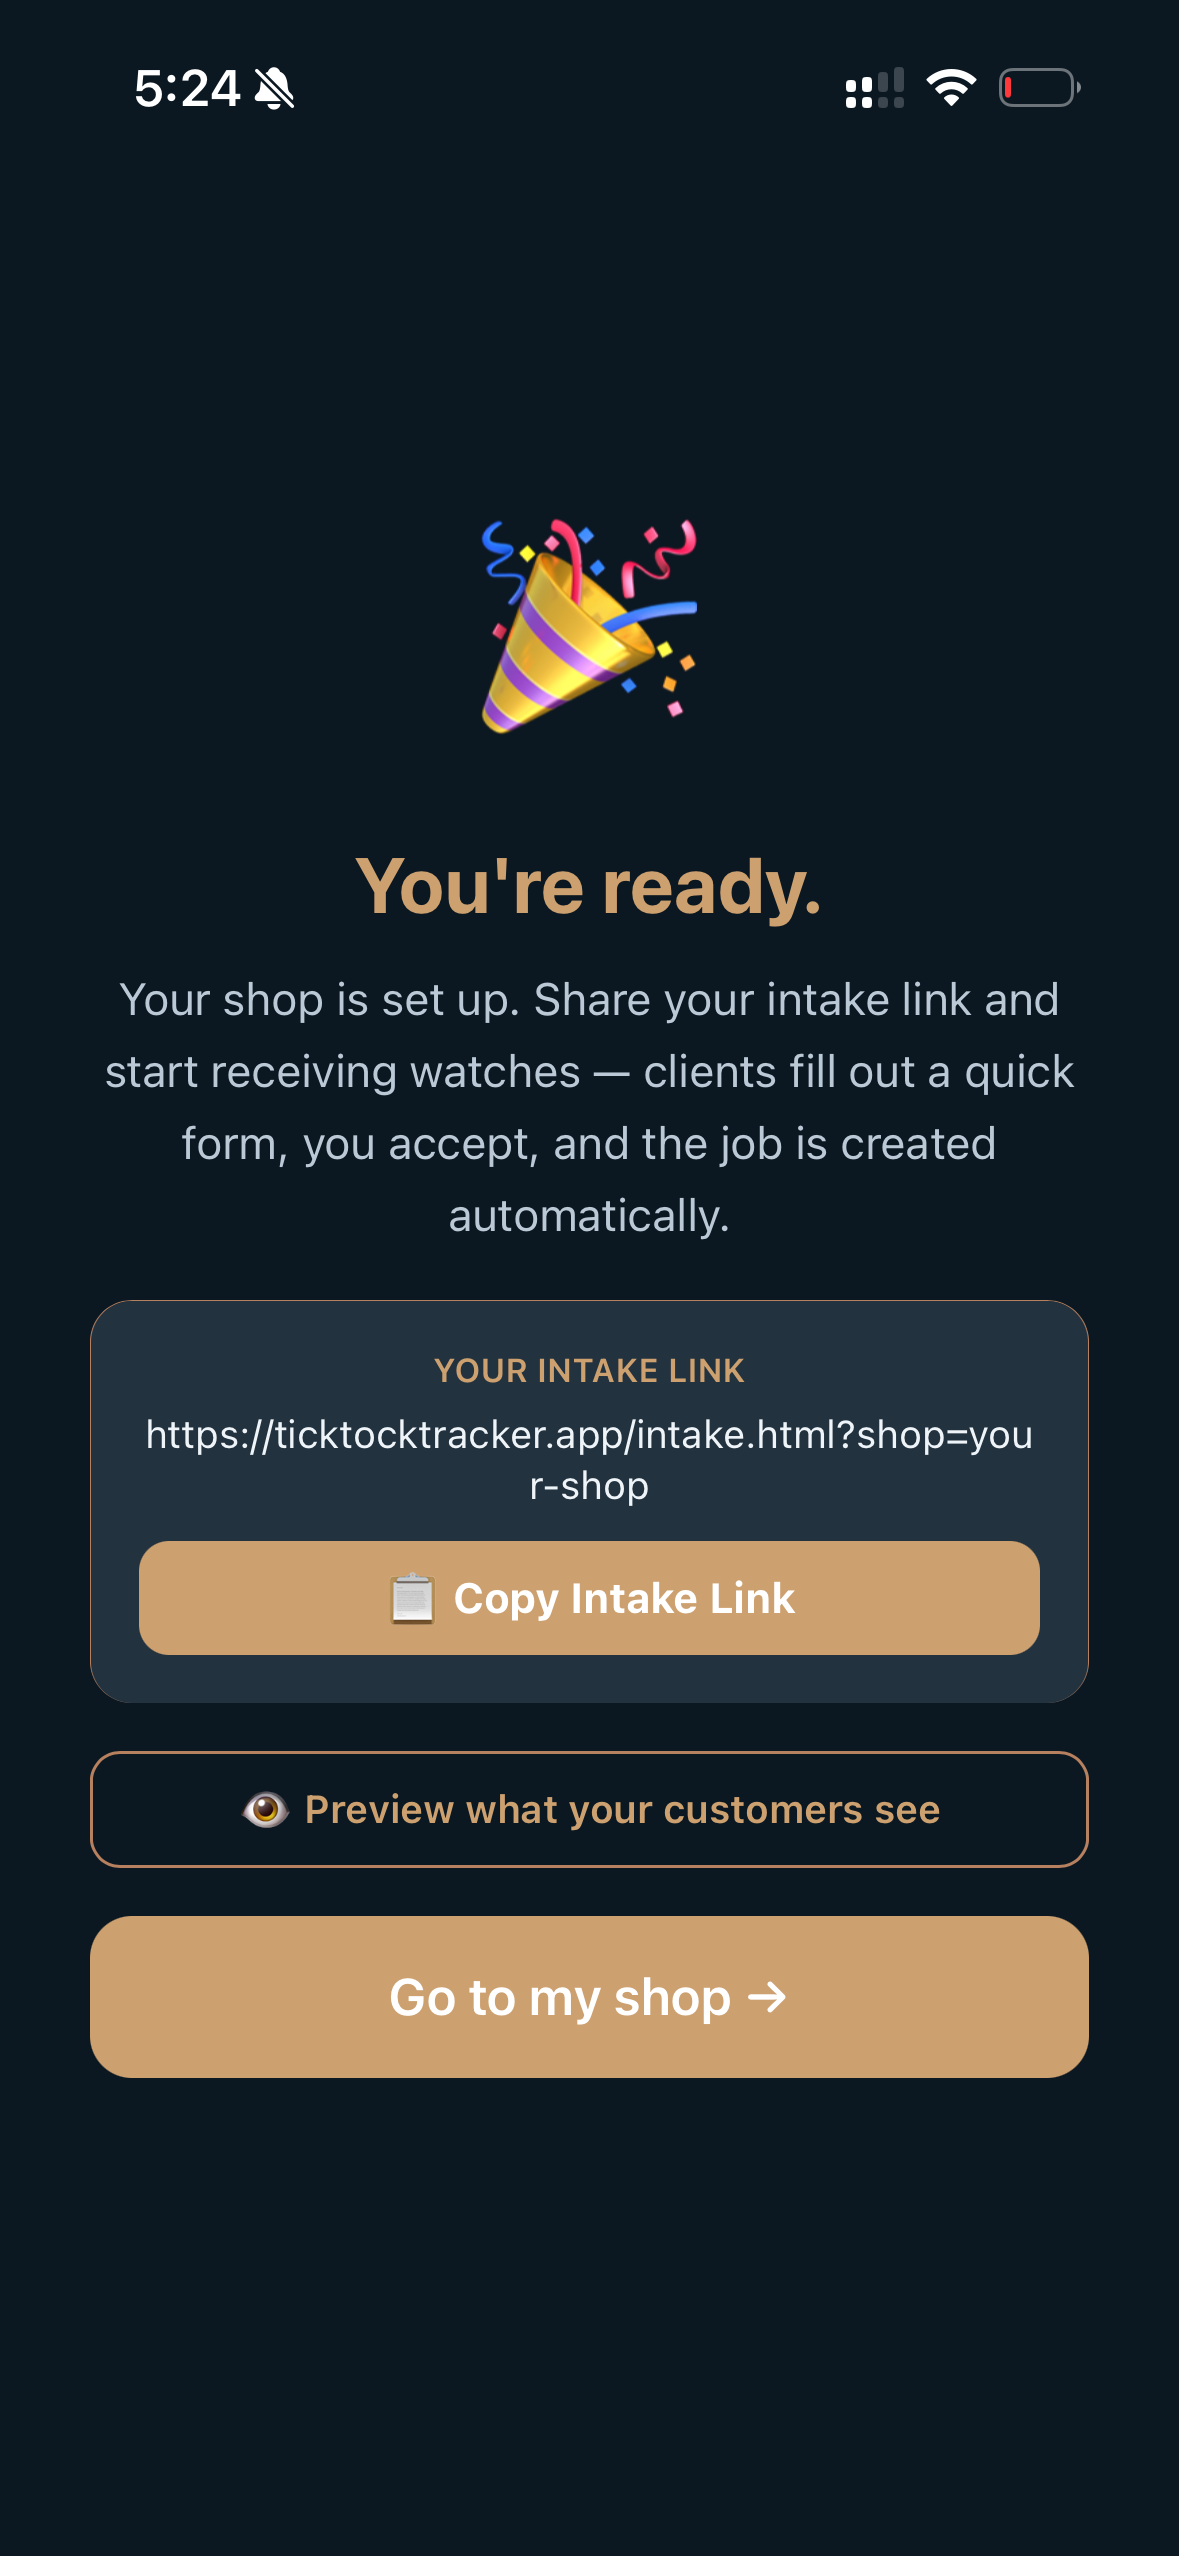
Then you're done, and the app hands you your intake link straight away. It looks like ticktocktracker.app/i/your-shop — short enough to read down a phone line or print on a card.
Tip
Tip: In Settings, under your intake link, tap ⬛ Get a QR code for this link. You get a scannable code and a Save the image button that writes a large PNG — big enough to print for the shop window, the counter, or the back of a business card. A customer points a camera at it and lands straight on your intake form, no typing and no app required.
The finish line. Copy your intake link and start handing it out — that's the whole business, in one URL.
Then you get a "you're ready" screen with your intake link and a Copy button.
Warning
Warning: The mailing address is the single most important setting. It's literally the address the app tells customers to ship their watch to. Double-check it.
Tip
Tip: You can tweak everything else later in Settings — payment handles (Venmo/Zelle), tax rate, your parts-and-labor price list. Don't worry about getting it all perfect on day one.
Getting a job in the door
Tap 🔧 Get a Job. You've got two ways to bring a watch in:
📧 Email the intake form — sends the customer a branded "Check in your watch" invite from the app's email address. (Your personal email and number stay private.)
📋 Copy the intake link — paste it into a text, your Instagram bio, your website, anywhere.
The customer fills out a simple web form — their info, the watch, the problem, photos. No app required on their end. Their submission lands in your Requests queue — and you get a push notification the moment it does, even with the app closed.
On the form, the customer also chooses how the watch gets to you: "I'll ship it myself" (they mail it with their own postage) or "Send me a prepaid shipping label" (you email them a ready‑to‑print label — the postage just goes on their final bill). If they pick the label, their request shows a 🏷️ "Wants a prepaid label" flag so you know to send one.
Tip
Tip: The very first thing to do is email the intake form to yourself. Fill it out as if you were a customer. Now you've seen exactly what your customers see — and you've got a practice job to play with.
Accepting the job
Open the request in your queue. You can ✅ Accept & Create Job, ❌ Decline, or 💬 Ask a Question first.
The moment you accept, the customer automatically gets an email and a text saying their request was accepted, with a private tracking link in the email. If they asked you to ship it themselves, the message tells them to mail it to your address. If they asked for a prepaid label, the message instead says "watch for your shipping label — don't mail it yet" (so they don't go pay for postage), and you send them one from the job (next chapter).
Remember
Remember: At "accept," the watch is still in the mail. The app says "please ship it," not "we have it." When the watch physically arrives, you set the status to Received — and that's the moment the customer is told "we have your watch."
Once a watch is in your hands, the job moves through clear stages. You just change the status as you go, and the app handles the rest.
The status lifecycle
A job moves: Intake → Pending → Received → Estimate Sent → In Progress → Parts Ordered → Ready → Shipped → Delivered. (Plus Declined, Cancelled, and Recalled when life happens.)
Every time you change the status, the customer automatically gets a short text. You don't write it. You don't send it. It just goes.
The estimate & approval gate (so you never do unapproved work)
Before you crack a watch open and order parts, you can send the customer an estimate to approve. On the job screen, tap "📋 Send estimate" — it quotes the current parts + labor total, and you can set an optional evaluation fee in case they decline.
The customer gets an email with the amount and a one‑tap Approve or Decline on their tracking page.
Approve → the job moves to In Progress — you're cleared to work, with a record of exactly what they agreed to.
Decline → the job moves to Declined — return the watch unrepaired (and collect your evaluation fee, if you set one).
Tip
Tip — the moving target is handled. Repairs change: a part costs more, a new fault turns up. If your total later climbs more than 10% over the approved amount — or you add a new part — the app flags that the estimate needs re‑approval and lets you send a revised one in a tap. Every version is timestamped, so there's a clean trail of what the customer approved and when. That's what protects you when "$120 becomes $190."
Let the AI draft the estimate for you
Don't want to build the quote from scratch? Tap "🤖 AI Assist — draft the estimate." It reads the customer's complaint, the watch, and a photo (if there is one), and drafts the likely issues, the parts and labor a typical repair involves with rough costs, and a suggested scope.
You're the expert — it's a starting point. Every suggestion has a checkbox: tick the ones that fit, edit the numbers, drop the rest, and "Add selected to the job." They drop straight into your estimate, ready to send. It'll even fill in the movement caliber if it can tell and you hadn't entered one.
Warning
Warning: It's a draft, not a diagnosis. Verify everything on the bench before you quote — and it won't invent a reference number or caliber it can't actually see.
The job screen, organized like a doctor's chart
Open a job and you'll notice it's laid out like a medical SOAP note — the format watchmakers found instantly familiar:
Subjective — what the customer reported (their complaint, their notes).
Objective — what you found (condition, timing measurements, water-resistance).
Plan — what you're doing (parts, labor, the work).
Comms — the conversation with the customer.
Little privacy badges (an 👁 eye, a 🔒 lock, a passport seal) show you at a glance what the customer can see, what's private to you, and what gets written onto the watch's permanent passport.
Remember
Remember: If you see a 🔒 lock, the customer can't see it. If you see an 👁 eye, they can. No guessing.
Photos — and who sees which ones
Photograph the watch as you work: what came in, what you found, what it looks like going home. Customers love this more than almost anything else in the app, and it's the cheapest trust you'll ever build.
Each photo has its own 👁 / 🔒 switch. Tap it to share a shot with the customer or keep it to yourself — the same way the Service Journal works. The section header tells you where you stand ("4 of 7 shared"), so you're never guessing.
Shared photos show up in the customer's app under 📷 From the bench, and on their tracking page if they never installed the app. A photo you've kept private never leaves our server at all — it isn't hidden on their screen, it simply isn't sent.
Tip
Tip: A private shot is useful for your own record — the movement before you touched it, the damage you don't want to argue about later. Share the ones that tell the story; keep the ones that are evidence.
The Service Journal (your dated notebook)
As you work, you'll want to jot things down. The job has a Service Journal — separate, dated entries, not one endless paragraph. Each time you add a note, it's stamped with the date, so you (and later, you again) can see how the job unfolded over time. You can edit or delete an entry, and you can choose to share a specific entry with the customer if you want them to see it.
Tip
Tip: There are two kinds of notes. The Service Journal is your private, dated work log. Notes for Client is a message you're writing to the customer — it autosaves as a draft while you work on it, and only goes to them when you deliberately publish it. So you can draft, walk away, come back, and nothing's lost or accidentally sent.
Parts: ordering, receiving, installing
Every part on a job has its own little tracker: supplier, order date, expected arrival, and a status (Ordered → Received → Installed).
When packages start arriving, the Parts Receiving dock is your friend. It lists every incoming part across all your jobs — with the watch and customer shown nice and big — so when a box shows up you find the right watch in one tap and mark it received. The customer automatically gets a "your part arrived" text. Overdue parts flag red and give you a once-a-day nudge.
Tip
Tip: Not sure which watch a mystery part belongs to? The dock has a "not sure which watch?" helper that shows you everything waiting on parts.
Charging for your labor — including the odd jobs
Labor goes on a job in two ways, and it's worth knowing both because the second one is the one people hunt for.
From the catalog. Tap + Labor and you get a list of the common jobs — full service, crystal replacement, crown and stem, and so on — each with a price you can adjust after. Tap what you did, tap Done, and it's on the job.
Your own wording. The catalog covers the usual work, and your bench doesn't stop there. Paint-filling the numerals on a bezel, straightening a lug, a favor for a regular that doesn't have a name — none of that is ever going to be in a list.
So: open + Labor, and either type what you did in the search box and tap "Add that as a custom service", or tap "Something else — type your own" at the bottom. It asks what you did and what you're charging, and puts it straight on the job.
Tip
Tip: You can also add free-text labor lines while creating or editing a job — the + Add Labor button next to + Labor on those screens does the same thing. Same result, whichever you reach for.
Letting the customer know about a part's cost
When you add a new, priced part, the customer is automatically given a heads-up (link-free text + email) that you identified a part and roughly what it costs. This is a soft heads-up — you keep working, you don't wait for a thumbs-up. If they have a concern, they raise it in the chat.
Warning
Warning: The app is careful not to double-text. This cost heads-up replaces the normal status text for that change, so the customer never gets two messages about the same thing.
Billing
Parts + labor + tax − any discount roll up into a job total automatically. Tap to generate a clean, branded PDF invoice. You can record full or partial payments.
Tip
Tip: Set up a Parts & Services catalog in Settings — your commonly-used parts and labor with prices. Then adding them to any job is a single tap, and your pricing stays consistent. And yes — if a part cost you more than your list price this time, you can edit the price right on the job.
Invoice before, paid receipt after. The same button changes with the job. While there's money owed it prints an invoice. Once the bill is settled in full it becomes 🧾 Print Paid Receipt — a proper receipt marked paid, with the watch's verification code on it.
That receipt is meant to be printed and put in the box with the watch. The customer gets something physical that says what was done, that it's paid, and that carries the code anyone can type into the public verify page. It's the paper equivalent of the passport, and it costs you one tap.
Knowing what a job actually paid you
Every job has a timer. Tap ▶︎ Start when you sit down to the watch, ⏸ Stop when you get up, and the job keeps a running total of your bench time. It survives closing the app and locking your phone — the clock does the counting, not the screen.
Once there's enough on it, the job tells you the number almost nobody at a bench actually knows:
$68.42/hr — $342.00 over 5h 00m (labour lines)
That's your labor charge divided by your real hours. Not the invoice — the parts are deliberately left out, because the price of a mainspring isn't something your hands earned. If you priced the job as one flat number with no labor lines, the app subtracts the parts and tells you that's what it did, so you always know which basis you're looking at.
It won't guess. Under fifteen minutes on the clock it shows no rate at all. Four minutes on a $300 job comes out at $4,500 an hour — true, useless, and the fastest way to teach you the feature lies.
Only one timer runs at a time. Start one on another watch and the first stops itself and tells you which. Two running at once means one of them is wrong, and it's always the one you forgot.
Warning
Warning:The timer never stops on its own. It runs through closing the app, locking your phone, and overnight. Past twelve hours the job says so — but it keeps counting, on purpose. The app won't invent an end time nobody witnessed; a made-up number that looks measured is worse than an obviously wrong one. If you left it running, tap Adjust and enter what really happened. A minus number takes time off.
Tip
Tip: Run it for a month before you change a single price. One job tells you nothing. Twenty tell you which work is quietly paying you half what you assumed — and that's usually the work you enjoy most, which is why it never got questioned.
Shipping labels, right in the app
You can buy a USPS label without leaving the app, in either direction, and it attaches to the job.
Getting the watch IN — the prepaid label. Early in a job (before it's ready), tap 📨 Send a prepaid label to the customer. Confirm the addresses (just pick from the Google dropdown so it fills city/state/ZIP cleanly), pick a box size, get rates, and buy. The app emails the customer a ready‑to‑print label — they print it, tape it on a small box, and drop it at USPS. No account, no postage for them to buy. This is the cure for the #1 friction point: a customer who isn't sure how to safely ship a watch in.
Warning
Warning: Customers can also ask you for a prepaid label when they book. When one has, your jobs list shows "🏷️ Label requested — not sent yet" on the job, and the Awaiting Watch heading counts how many are waiting on you. Send it reasonably promptly — while a label is pending, the app deliberately leaves your address out of that customer's messages (it told them to wait for the label instead), so until you buy it they have no way to send the watch at all.
Sending the watch BACK — the return label. Once a job is Ready, tap 🏷️ Buy a shipping label. Same flow — the tracking auto‑fills, the job moves to Shipped, and the customer is automatically notified with the carrier's tracking link.
The cost takes care of itself. Whenever you buy a label, the app adds a "🚚 Shipping & handling" line to that job's bill — the postage plus a small 2% convenience fee, rounded up. It shows up itemized on the customer's tracking page and invoice, and they pay it when they settle the bill. You're made whole automatically; the line is editable if you ever want to absorb it.
Tip
Tip: The prepaid label keeps your private contact info private. The customer gets it from the app's email address (noreply@…), not yours — and the only contact on the label is whatever you set as your shop phone, email, and address in Settings. Put a dedicated number/email there (not your personal cell) and you stay private.
✅ Live: Shipping is live. Buying a label charges real USPS postage and produces a real, scannable label that actually ships the watch and notifies the customer. Buy your first label on a real job to confirm your setup, then it's routine.
Bench capacity (so you don't drown)
Set your bench capacity — how many watches you're willing to have in hand at once — and an accepting status (🟢 accepting / 🟡 waitlist / 🔴 not accepting).
Your capacity is the dial. When your bench is full, your public listing switches itself to 🟡 Waitlist automatically, so collectors filtering for shops with room don't see you. Deliver something and it switches back on its own. You never have to remember. If you find you can take more, raise the capacity — don't fight the status.
Remember
Remember: Setting yourself 🔴 Not accepting always wins, whatever your bench looks like. Closed is closed.
When you're full, accepting a new request puts it on a waitlist — the customer is told their place in line and to hold onto their watch until you're ready.
A watch comes off the waitlist when any of these happen:
You mark a job Delivered, Shipped, Cancelled, or Recalled by Client — a slot frees.
You raise your bench capacity — new slots open immediately.
You tap Start now on a waitlisted job — takes it out of order, whenever you want it.
However it happens, the customer is contacted the same way: a text if that's all you have for them, otherwise the full "your slot is ready, here's where to ship it" email with a tracking link. If two slots open at once, two people get called — it fills every space you've got, not just the next one in line.
Chapter 6
Getting Paid
Money can move inside the app now — no more chasing Venmo, Zelle, or cash by hand (though you can still record those by hand if you like).
How it works
When you mark a repair Ready, the customer gets an invoice and can pay by card — right in the app, or on their tracking page. The money goes straight to your bank.
They can still pay after that. Ready, Shipped and Delivered are all payable, so a watch that went home before the bill was settled can still be paid for.
The same card payments cover Parts Hub purchases and Ask-a-Watchmaker consult fees (more on those below).
The platform takes a small 2% fee on the repair work. Shipping is excluded — you already covered postage out of your Postage Wallet, so the reimbursement isn't skimmed twice. On a $50 job with $9 of shipping, the fee is 82¢, not a dollar.
If you refund, the fee comes back too.
Connecting your bank
You connect your bank through Stripe's own quick guided setup — about three minutes. Payouts are open in 35 countries: the US, Canada, the UK, Switzerland, Australia and across the EEA. You pick your country once and it can't be changed afterwards, so choose the country your bank is actually in. Stripe is the licensed company that actually handles the money; you're the merchant. (This is also why the platform doesn't need a money-transmitter license — Stripe carries that.)
✅ This is live. In-app card payments went live on 30 July 2026 — the first repair was paid for through the app that day. Nothing in this chapter is aspirational.
Technical Stuff
Technical Stuff: If a payment ever shows as unpaid when your customer says they've paid, open the job — the app re-checks with Stripe directly and corrects itself. You don't have to do anything. (Card payments are confirmed two ways on purpose, so a single missed message can't leave you chasing money you've already been sent.)
Technical Stuff
Technical Stuff: The customer's card is entered on Stripe's own secure page. The app never sees or stores a card number. The homepage even has a "Your Card, Protected" section saying exactly this, so customers feel safe paying.
Two ways to earn beyond repairs
🔎 Ask a Watchmaker — let collectors pay a small fee (you set it, $25 minimum) to ask you a few questions before committing to a repair. You're paid right away, and it tends to win you the job. If you don't reply within 24 hours, they're automatically refunded — so it's fair to everyone. If they book a repair within 30 days, their fee comes off the bill.
🔧 Parts Hub — a parts exchange with other watchmakers (see below).
The Parts Hub — buy and sell parts
A swap meet for the bench. Post a part you're 🔎 In Search Of or one you have 🟢 Available (set a price and a shipping amount). Need to change something? ✏️ Edit any of your own listings to fix a typo, adjust the price/shipping, or swap the photo — and 🔁 flip a listing between ISO and Available in one tap. No deleting and reposting.
When someone buys your part:
They pay item + shipping by card up front (the buyer always pays shipping, so you're never out of pocket).
You print a shipping label in one tap right on the order (🏷️ Buy label) — it captures the tracking and marks it shipped — or mark it shipped yourself.
Can't fulfill it? One tap refunds the buyer in full (item and shipping) and re-opens your listing.
Technical Stuff
Technical Stuff: the shipping you collect funds the label, and it's automatically refunded to the buyer if the part never ships — so neither side carries any risk. Parts payments use the same Stripe setup as repairs, which is now live.
Your books, exported to QuickBooks
On your Analytics screen, tap 📒 Export for QuickBooks and you get a clean spreadsheet of every job — date, customer, parts, labor, shipping, tax, total, paid, balance, status. Open it in Excel or Google Sheets, or hand it straight to your bookkeeper. No more retyping a year of income at tax time.
Tip
Tip: on a phone, tap Save to Files then open it in Numbers — or Mail it to your computer, which is the easiest way to work with it.
Chapter 7
Letting the App Do the Talking
This is the feature watchmakers fall in love with. You change a status. The app talks to your customer. You never compose the message.
The golden rule of messaging
Remember
Remember:Links go by email. Plain nudges go by text. Here's why it matters: phone carriers quietly block links in low-volume business texts, so a text with a link in it often just... vanishes. So the app sends anything with a link (the tracking page, the invoice) by email, and keeps texts short and link-free ("Your watch is now RECEIVED"). You don't have to think about this — the app already does.
What the customer gets, and when
They submit the intake form → email + text: "Request received." (And you get a push notification.)
You accept → email + text: "Accepted," with a tracking link in the email. If they're shipping it themselves, it includes your address; if they asked for a prepaid label, it tells them to wait for the label instead.
You send a prepaid label → the customer is emailed a ready‑to‑print label with simple instructions. If they never mail the watch, tap ↩︎ Void label & refund postage on the job — you get the postage back and the charge comes off their bill, so you're never out of pocket for a label nobody used.
You decline → a polite email + text, so nobody's left hanging.
You mark Received → text: "We have your watch."
Every step after that (In Progress, Parts Ordered, Ready, Shipped, Delivered) → a short text.
You ship it back → pick the carrier, enter the tracking number, tap Save & Notify → the customer gets the carrier's tracking link by text and email.
Messaging a customer directly
Every job has a two-way chat. If the customer has the app, they get a push notification. If they don't, the app shows you a Contact Customer sheet — you type one message and it goes out by both text and email so it reliably lands, and there's an "Invite to the app" button right there.
Tip
Tip: There's a "👁 View customer's status page" button so you can see exactly what your customer sees on their tracking page — handy when they call confused. And a "📧 Resend tracking link" button for when someone says "I lost the link."
Warning
Warning: The app never exposes your personal phone number or email to customers. Even when they message you, it routes through the app. Your private contact info stays private — by design.
Your Chats screen, sorted for you
Open Community → 💬 Chats and every conversation is filed into a labeled folder, so you can tell at a glance who's who before you read a word:
🔧 On your bench — customers whose watches you're holding.
✉️ Inquiries — someone who's written in but isn't a customer yet. The folder has a dashed edge: the border isn't closed, because neither is the deal.
📦 Your watches out — watches you have sent to someone else for service.
⚙️ Peers — other watchmakers. (If you don't run a bench, this reads Watchmakers instead.)
👤 Collectors — friends, just talking.
The folder follows the work, not the job title. A watchmaker who sends you a watch sits under On your bench, because while their watch is with you that's what they are.
Remember
Remember: The glow means one thing only — this needs you. Color tells you what a conversation is; the glow tells you what's unread. Nothing else glows, so nothing else competes for your eye.
Archiving. Swipe a chat left to file it away (there's a five-second "undo" if you catch it). Archived isn't gone:
If that person messages you again, the chat comes straight back out.
If you reply to an archived chat, it comes back too.
Just reading an archived message leaves it filed — reading isn't the same as picking the conversation back up.
You'll find anything filed under the 🗄️ Archived toggle at the top of Chats.
Part 3
For Collectors — Your Collection, Organized
Chapter 8
Building Your Collection
The one-time setup
The first time you log in as a collector, the app walks you through a short flow (it only runs once):
Welcome.
Add your first watch — a photo and the brand are all that's required. Haven't got one to hand? Tap "I don't have one to hand — let me look around" and you go straight in with an empty collection. You can add a watch whenever you like.
An AI scan runs automatically on that watch — instant identification and a value estimate. (This is the "wow" moment.)
Meet the Passport — your watch's permanent history.
You're all set — your collection appears, with its value.
Adding more watches — the fast way (you don't have to type)
This is the part people miss, so it's worth saying plainly: you almost never have to fill in a form.
Open your Collection and you'll see two buttons. The first one is the one to use:
📸 Snap & Identify — take a photo of the dial (and the caseback and movement if you can), tap 🧠 Identify Watch, and the app fills in the brand, model, year and movement for you. You check it, correct anything it got wrong, and save. About thirty seconds.
+ Add Manually — the full form, for when you'd rather type, or when you're adding something the camera won't help with.
Remember
Remember: Manual entry is the fallback, not the main road. If you opened the app, saw a long form and closed it again — that form was never the way in. Go back and use Snap & Identify.
It's free to try. Every free account gets a few AI scans at no cost — enough to add your first watches without paying anything. Scan a lot and the paid plans lift the limit; you'll be told when you're near it rather than hitting a wall.
Tip
Tip: Photograph the caseback as well as the dial. That's where the serial number usually lives, and the serial is what lets a watch be publicly verified later (see Part 4).
What a watch record holds
Each watch in your collection can carry: brand, model, year, serial number, movement, condition, whether you have the box & papers, what you paid, its estimated value, and photos.
Tip
Tip: Add the serial number when you can. It's the key that links your watch to its passport and lets it be publicly verified later (see Part 4). A watch with a serial on file is a watch you can prove.
Open your collection and the first thing you see is a "net-worth" card: Your Collection — $184,200 ▲ +25%, with the number counting up as you add or value watches. Each watch shows its gain or loss versus what you paid. Think "Robinhood or Mint, but for watches."
Remember
Remember: The value is your adjustable estimate, shown as a range — "eye of the beholder." The AI suggests a starting number; you can set your own. The app never claims a precise live market price, which keeps it honest and keeps it yours.
Technical Stuff
Technical Stuff: Just looking at your dashboard is free and instant — it's adding up numbers already stored on your device, no AI involved. The AI only does real work when you deliberately tap to scan or refresh a value, and even then it won't re-value a watch you valued in the last two weeks. That keeps it fast and keeps costs sane.
The AI Advisor
Point your camera at a watch — or open any watch you've already added — and the AI Advisor gives you an identification, a market-value estimate, and authentication help. Re-run it anytime from any watch.
Warning
Warning: On the free plan, the Collection Value total shows as a blurred teaser, and you get a limited number of lifetime AI scans. Collector Pro reveals the full value picture and opens up the AI. (See Chapter 15.)
Chapter 10
The Marketplace and Friends
Listing a watch
Any watch in your collection can be marked for sale or trade, with an asking price (or "trade only"). One simple idea runs through the whole thing: a watch is either Listed or it isn't. List or unlist a single watch from its detail screen, or several at once with ✓ Select.
Each listing has a one-tap 🌐 Public / 👥 Friends Only toggle (only you can see it) so you can move a watch between the public marketplace and your private friends circle instantly.
Friends — the trust layer
This is what makes the marketplace different from trading with anonymous strangers:
Find friends by name or @handle and tap Connect, or send anyone a personal invite link (when they join, you're automatically connected).
The feed — post a find, ask a question, react and comment. The feed is an open forum: every member of Tick Tock Tracker sees what you post there, not only the people you're connected to. The app says so above the box you type in. Connecting still matters for the private marketplace below — it just isn't what decides who reads your posts.
Friends marketplace — a private marketplace of just your trusted circle's listings.
Two ways to see what a friend has listed:
The Friends Marketplace — open the Marketplace and switch to the Friends filter to browse everything your connections currently have listed, all in one place.
Their profile — tap a friend (from a chat or the directory) to see their personal "🏪 Marketplace" — just the watches that person has listed. Tap any watch to open the full listing and message them about it.
Both show only what each person chose to list — and both honor the 🌐/👥 toggle.
Warning
Warning — privacy by design: When a friend looks at your profile, they see the watches you've listed for sale — and never your collection's total value or your private contact info. Watches you haven't listed stay completely private. And a "👥 Friends Only" listing is hidden from non‑friends who find you in the directory — they only see your public listings. The whole social layer is built so you can be social without broadcasting what your collection is worth or where it lives.
Technical Stuff
Technical Stuff: The Mainspring is a one-way announcement channel only the app's founder can post to — pinned to the top of everyone's feed for product news and feedback requests. You can't post to it; that's locked down on the server, not just hidden in the app.
Selling on Whatnot
If you sell on Whatnot (the live‑shopping platform), catalog your watches here once and export them in a click. In your Collection tap 🏷️ (select), tick the watches you're listing, and tap ⬇ Whatnot — it builds a ready‑to‑upload spreadsheet for Whatnot's bulk lister, with titles, prices, conditions, and photos already filled in.
Tip
Tip: the real edge — each exported listing's description automatically carries the watch's verified service history and a free "verify this watch" link. On a fast‑moving live auction, provable provenance is what justifies the price and wins the trust no other seller's listing can.
Sending a watch out for service
Browse the Watchmaker Directory — each shop's star rating, typical wait, and whether they're accepting (🟢 / 🟡 / 🔴). Open a watch → Send for Service → pick a shop, and choose how it gets there: ship it yourself or have them send you a prepaid label.
From there you follow the whole repair inside your collection:
When the watchmaker sends an estimate, you approve it right on the watch's status screen — tap ✅ Approve & start work (or Decline). Nothing happens to your watch until you say go.
Message the watchmaker directly, in the app, without either of you exposing a phone number.
When the job's done, their signed service record lands on your watch's passport automatically.
Part 4
The Watch Passport — The Big Idea
Chapter 11
Provenance You Can Prove
If you read only one part of this book, read this one. The Watch Passport is what makes Tick Tock Tracker different from every other watch app.
What it is
The Passport is a permanent, travel-with-the-watch logbook of everything that's ever happened to a watch: when it was bought, who's owned it, and every professional service performed on it — what was done, by whom, when, with photos and price.
Where the entries come from
A collector adds history by hand: purchase, prior service, notes. These are marked "Owner-added · unverified" on the passport.
A watchmakersigns a verified "Service Completed" entry onto the passport when they finish a job — capturing the parts, the labor, the shop name, the date, and photos. These carry the 📜 Verified badge.
That second one is the powerful part. The service record is written and signed by the professional who actually did the work — not self-reported by a seller hoping you'll believe them.
Both belong on the passport, and you can always tell them apart. Your own notes are worth keeping — a receipt from a 2019 service is real history, and a watch that's been looked after should say so. It just doesn't get to borrow the credibility of a signed record. A buyer reading the passport can see at a glance which is which, and that distinction is the whole reason the passport is worth anything.
Why it matters
A watch with a complete, professionally-verified passport is worth more and easier to trust. It's the difference between "the seller says it was serviced" and "here's the proof." For insurance, for resale, for the next owner — provenance you can actually prove.
Remember
Remember: Because the watchmaker and the collector are in the same app, the entry the watchmaker writes lands directly on the collector's watch. When the watch changes hands, the new owner can claim the passport and inherit its full verified history. The record follows the watch, not the person.
Chapter 12
Verifying a Watch (the "CARFAX for Watches")
Here's the part that turns the passport from a nice feature into a genuine moat.
Sign & Record Permanently
When a watchmaker finishes a job, they tap Sign & Record Permanently on a screen that spells out, in writing, that the entry can never be edited or deleted and will be visible to all future owners. At that moment the app creates a unique verification code for the entry — something like 3f8a-92bc-44d1 — printed on the in-app passport, the PDF, and any printed record.
After you seal it, the bill locks — and how to get back in
Here's the one thing that surprises people, so read this before it happens to you.
Once you seal a watch's passport, that job's parts and labor stop being editable. The + Services button goes away and you get an explanation in its place.
That isn't the app being awkward. The sealed entry describes the work as it was when you signed it. If you could quietly add a $120 part afterwards, the certificate would describe work that no longer matched the invoice — while still showing as verified. That's the one thing a provenance record must never do.
But you're not stuck. If you genuinely forgot something, the explanation ends with a link: "Need to add something anyway?" Tap it, make your correction, and seal again. The passport records that honestly rather than pretending it never happened.
Remember
Remember: Seal when the work is finished and priced, not the moment the watch runs. Sealing early and unsealing to fix the bill works, but doing it repeatedly makes a messy history for something whose whole value is being clean.
Tamper-evident, in plain English
Technical Stuff
Technical Stuff: The app computes a SHA-256 hash — a mathematical fingerprint — of the entry's exact contents. That fingerprint is frozen in a separate, write-once log in the database that can be read but never edited or deleted, not even through the normal app. Every time the passport is viewed, exported, or the watch changes hands, the app re-computes the fingerprint and compares it to the frozen original. Match → a quiet green ✓ Verified. Mismatch → a warning. If anyone ever alters the entry, the fingerprint breaks and the tampering is exposed. It's the same principle that secures banking and legal documents.
Public verification — no account needed
This is the moat. Anyone — a buyer, an insurer, a curious stranger — can go to the public verify page, type in a watch's brand and serial number (or its verify code), and get a privacy-safe summary of its verified service history. No login. No account. It looks like a Certificate of Service — a wax-seal badge that says this record is real and untampered.
No serial number? Plenty of vintage watches never had one, or it's long since polished off. Use the verify code instead — it's on the watch's passport card and works exactly the same. A missing serial doesn't mean a watch can't be verified.
It verifies the book, too. The signed, hand-numbered Collector Edition of The Watch Doctor's Almanac carries a code on its bookplate. Type that into the same page and it confirms the number is genuine and the month it was issued — and never who owns it. Provenance shouldn't require exposing the owner, whether it's a watch or a book.
What the public sees is deliberately limited: the verified service headlines and a "✓ Verified" seal — never the owner's name, the prices, the full serial number, or where the watch lives. The full record only goes to a buyer the owner chooses to share it with.
Remember
Remember: This is "CARFAX for watches." A stranger can confirm a watch's service history is real before money changes hands — without you handing over anything private. That's trust you can't fake, and nobody else in this space has it.
See it live — verify a watch's service history yourself (no account, takes 5 seconds)
Texts your customer at every step of the repair — you just change the status.
Emails the tracking link and invoice (because texts with links get blocked by carriers).
Tells the customer when their part arrives the moment you mark it received.
Stops duplicate customers by matching new intakes to existing clients, and merges any duplicates you already have.
Builds the invoice — parts + labor + tax − discount, into a branded PDF.
Asks the customer for a review automatically when the job is delivered.
Runs a waitlist when your bench is full and invites the next person when a slot opens.
Values your collection and counts the total up as you add watches.
Identifies a watch from a photo with the AI Advisor.
Proves a watch's service history to a buyer — without exposing anything private.
Chapter 14
Ten Ways to Get the Most Out of Tick Tock Tracker
Install it on your phone and your computer. Everything syncs.
Send yourself a test intake form before you send one to a real customer.
Get your mailing address exactly right — it's the address customers ship to.
Build your Parts & Services catalog so billing is one tap and prices stay consistent.
Add serial numbers to your watches — it's the key to verification and resale value.
Use the Service Journal for dated work notes; use "Notes for Client" only for things you want them to read.
Mark parts received from the Receiving dock so customers get the auto "it arrived" text.
Set your bench capacity so you don't over-commit and the waitlist runs itself.
Tell customers to save the texting number and to mark the email "Not Junk" if it lands in spam.
Run both modes if you're a watchmaker and a collector — your own watches get the same passports your customers' watches do.
Chapter 15
A Quick Word on Price
You don't pay to use the app. The core is free. You pay only for extra capacity and pro tools, and there's a small fee when money actually moves through the app.
Free — genuinely useful, not a crippled trial: 5 watches, 5 jobs, 3 lifetime AI scans, both sides to sample, marketplace browsing, basic tracking. And — this is the important part — verified passports and the public verify page are free for everyone. The moat is never paywalled.
Collector Pro — $9.99/mo or $99/yr — unlimited watches, generous AI scans, the full Collection Value reveal, printable passport PDFs, unlimited listings, the Friends marketplace.
Shop Solo — founding rate $39.95/mo or $395/yr (50% off the $79/mo standard) — everything in Collector Pro plus the full watchmaker business: unlimited jobs, automatic SMS updates, intake forms, branded invoices, parts/labor/billing, analytics, and a Verified directory listing.
In-app card payments carry a small 2% platform fee. That fee is how the app earns its keep — so the tools can stay free.
Founding members — the early crowd gets the best deal
Remember
Remember — the Founding promise: - Founding Watchmakers — the shops that join in our founding window — lock in 50% off Shop Solo for as long as you stay subscribed (the lowest rate we'll ever offer), with the full Shop toolset free while we're in early access. You'll never pay what later shops pay, and nothing you rely on ever gets locked behind a paywall. - Founding Collectors are free to use from day one (5 watches, AI, and verified passports — provenance is free for everyone), and lock in 50% off Collector Pro for as long as you stay subscribed if you ever want unlimited watches, whole-collection value, and printable certificates. - Your stuff is always yours. If pricing ever changes, your existing watches, your passports, and your public verify pages stay exactly as they are — nothing is deleted, hidden, or held hostage. The free tier only ever limits adding new items; it never touches what you've already built.
✅ Live now: Subscriptions and purchases are live — this is real billing, and founding members are already subscribed at these rates. The one piece still switching on is in-app watchmaker payouts (paying watchmakers to their bank for repairs, parts, and consults) — that's in final Stripe setup. Your founding rate stays locked as long as you keep your subscription.